welcome

Everyone needs a place and space to be heard... to share and express that which is important in their lives... this is mine.

Sunday, November 30, 2008

Christmas Card for My Sister

Hello Friends
My baby sister is 21 years younger than me... quite an age spread between us! She isn't a 'baby' any more and has started her own family (you saw the wedding card I made her in August). This Christmas card is for her family. I wanted to use her favorite color, a shade of lime green, in her card. The tree was painted with Twinkling H2O's (key lime, mallard green and mango mamba) and accented with yellow stickles glue. It's very sparkly :)
I have been working on a special project this week that I'll be sharing in the upcoming days so stay tuned!
Stamp credits- Stampin' UP
Kimm

Friday, November 28, 2008

Christmas Rose

I think red roses for Christmas are simply beautiful. Maybe it's their velvety red petals or the warmth of summer brought to winter that strikes me as being so special. I've been saving this little beauty to share with you today.
The rose itself was painted with the Moonlight technique I created using Twinkling H2O's (TJ issue Aug. 06). The background is Metallic Bands technique (TJ issue Oct. 06) in shades of red.. with bands of gold and silver added with a rubber band wrapped brayer.
Enjoy your day today... and I hope you find all the shopping deals you've been looking for!
Stamp credits- 100 Proof Press, Stampin' UP
Kimm


Wednesday, November 26, 2008

Little Red Card

I decided I needed a quick little red number as I've posted so many cards using shades of blue! My youngest daughter thinks all Christmas cards should be red and green so this one makes her happy:)
No special technique... just simple stamping with the base layer embossed with swiss dots through the cuttlebug.
Stamp credits- Stampin' UP
Kimm

Monday, November 24, 2008

Spreading the Cheer

This plump little snowman is ready to spread some holiday cheer... the flaky frozen kind! I stamped this snowman image by Stubby Stampers in blue... then colored with Prisma pencils... using a blue and lavender for shadow. The background is Silken Mist (TJ issue Oct. '06) with Twinkling H2O's... True Blue and Wintermint.
Next time I am sharing a fabulous new TJ technique... a holiday sneak peak!!

Kimm BT

Saturday, November 22, 2008

Extreme Snowflakes

My holiday card for today... although simple in design... is not easy to photograph! The technique comes from Technique Junkies CD5 as a bonus technique- Tarnished Mirror. The technique uses mirricard... and it's that cardstock that is giving my camera fits! Where you see black on the card, I promise it is not black, but silver mirror cardstock!

Here is a close up... hopefully you can see some of the alcohol ink in stream and denim. Once completed I ran the section through the snowflakes embossing folder. The card is fantastic when you can hold it in your hand... talk about extremely shiny snowflakes! I'm going to make a few of these to give to fellow stampers at a Christmas party:)
Stamp credits- Stampin' UP
Kimm

Thursday, November 20, 2008

Season's Greetings

As promised... a super easy card ideal for making bunches in assembly line style. The background is Watercolor Roll (TJ issue June '06). I used bashful blue, turquoise and teal watercolor crayons... creating full background sheets at a time. Once the sheets dried, I cut to size and stamped the snowflake background (Hero Arts) with navy dye ink. Season's Greetings (Stampin' UP!) was embossed in white ep... and flat pearl embellishments were then added. So easy!!
Stamp credits- Hero Arts, Stampin' UP
Kimm

Tuesday, November 18, 2008

Chilly!

It is a brisk November morning here in Memphis! We went below freezing last night and there is a chilly wind coming from the north. It's feeling like it should snow!
My card share today has cool toned blues and teal with crisp snow white accents! The background is Veined Marble (Technique Junkies Aug. 07 issue). I embossed the tree image from Stampin' UP with black EP... then cut out and layered on the textured teal cardstock. I liked the ribbon when I put it on, but now that I've scanned my card, it feels out of place. Hmm.. maybe the lower right corner would have been better??
Next time I have a super easy one to share!
Kimm

Sunday, November 16, 2008

Organizing Finished Cards

I needed to spend some time yesterday cleaning and organizing my stamp space. I am fortunate that I have my own delegated stamping area. We converted our garage to work space for my hubby (he gets half the room) and work space for me (I get the other half). My stamp space isn't pretty... but its functional!
One of the big tasks I needed to accomplish was to sort and organize my finished cards. I create about a dozen cards a month. Over the course of a year, I end up with more than a hundred! If I've not used them during the year... they sit in small boxes. Its these boxes of assorted cards (some full cards, some card fronts) that needed my attention.


Once I have totally completed a card including stamping any greeting on the inside and signed the back, it is placed in a 4"x6" cello bag with the proper envelope (sometimes those are stamped too!). These are then sorted by card types... birthday, cards for kids, Christan, thank you, etc. I keep them in a longer box as shown. I still have 20-25 more cards that need to be placed in cello bags with their envy... but I ran out of cello bags!

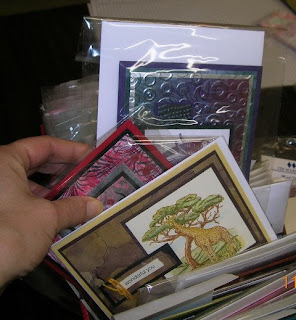
From here it is easy for me to grab a card and go. Often my kids will pick through my card box for something they need... Or I can easily prepare a box of assorted cards for a gift. Sometimes they are sold at $5 each... less if they are very basic.
I've seen other stampers with much prettier organization systems for their cards.... nice baskets and decorated boxes or lunch box tins are some ideas. I have to really discipline myself just to keep up with this functional system. I hope you have a system that works for you. Take a photo and post the link to your blog... I'd love to see other ideas!
Kimm

Faux Stippled Twinks 2

This shimmery background may look familiar. It came from the same background sheet as my last card post. I changed the card design and made it a tad smaller so it can be used as a large gift tag. The vellum layer was crinkled and the edges highlighted with white pigment ink and heat set. I like the jumbo eyelets on this as it seems to punctuate the greeting more.
I highly recommend making full 8 1/2 x 11 sheets when playing with different techniques wherever possible. Having a day when your creativity seems off? Use your time making background sheets in different colors! You won't have to think about a full card design and embellishments... but you will have prepared sheets ready for you when your ideas start flowing again! Because the background sheet was already made ahead, this gift tag took all of 3-4 minutes to make!
Stamp credits: Stampin' UP

Kimm

Friday, November 14, 2008

Faux Stippled Twinks

Those rich shimmery little pots of watercolor paint... They are my favorite product... Twinkling H2O's by Luminarte Inc. I used teal zircon and ocean wave to create the faux stippling background from Technique Junkies issue Dec. '06. Once dry, I stamped my large snowflake with brilliant blue dye ink. The rick rack embellishment is blue velvet... just the right touch next to the shimmer background.
stamp credits- Stampin' UP
Kimm

Wednesday, November 12, 2008

Love Green?

Today's holiday card is for all you gals that love green! I used multiple shades of green... from a light lime green to cool blue-green to deep hunter green. The main image is stamped with the Expressionistic Watercolors technique (TJ issue Dec. 04) using Kaliedacolor pad Fresh Greens. I used hunter green to define the shape using a stamp positioner to find the perfect alignment for the image and over stamp.
I love using mixed green colors! And you really can't go wrong using these colors any time of year!
Stamp credits- Stampin' UP
Kimm

Happiness Always

A quick share with scraps from my technique pile. The top panel uses copper cardstock with patches of pearl white lumiere... then ran through the cuttlebug leafy branch embossing folder. I highlighted with Staz On violet. The background panel is a section of Silken Mist (TJ issue Oct. 06).
Stamp credits- Hampton Arts, I Brake for Stamps, Stampin UP
Kimm

Monday, November 10, 2008

Oh! Christmas Tree

Today's card features a 2-step style Christmas Tree stamp from The Angel Company. The background uses two techniques... Opalite Smoosh (Technique Junkies issue Feb. 05) and Cuttlebug Highlights (Technique Junkies issue Oct. 08). As with most mica based products, it is hard to see the mix of interference colors in this scan... I used Arctic Emerald and Glacier Blue opalite inks to complete the opalite smoosh background. Then I ran that section through the cuttlebug and highlighted the embossing with brilliant blue dye ink. The tree silhouette was stamped in a cool blue dye ink, then the snowy tips were stamped with versamark and embossed with iridescent ice EP. A simple card sketch that is high on shimmer the shimmer scale!
Stamp credits- The Angel Company
Kimm BT

Saturday, November 8, 2008

I case'd a card and a story of friendship

Confession... I case'd a card made by another stamp artist. This card idea was not in any way my original idea. Part of the reason for my confession is that I do not usually completely copy another stampers artwork... In fact, I usually avoid the popular SCS so that I can keep my own ideas fresh and 'copy free'. But I fell in love with the original card by Julee Tilman at Poetic Artistry. I think hers is still prettier than mine... but at least I am happy with my attempt to recreate her little masterpiece.

The base and rectangular layers were inked in a burnt edges manner (TJ issue Feb. 07) but I used a baby pink and rose romance on vanilla cardstock. Those layers were ran through the cuttlebug snowflake embossing folder and then highlighted with rose romance ink. The 2" center circle was edged with only baby pink ink. The basic gray under layer is a 2 1/2" scallop punch. I did not have the exact nestabilities dies nor the same fern punch that Julee used in her original. (A story about that punch to come). After searching high and low, I did find a tree punch by McGill and used that for the 'frosty' looking edges and sponged a bit of baby pink ink then added a touch of cotton candy Stickles glitter glue to the tips of the branches. Another item I didn't have was Liquid Pearls, so I used pearl embellishments on an adhesive strip. The adhesive strip made it easy to place the pearls around the center circle.

Next I decided to make another version... this time with touches of my own. I used a sheet of glitter paper to punch out the tree branches (big time saver over adding stickles glue to all the little tips!). Instead of highlighting the embossed snowflakes with pink ink, I pressed Crystal Blush Opalite ink over the entire piece. That delicate shimmer doesn't show in the full card photo, but you can see it in the close up below.
I do love the pearl embellishments, but choose to leave them off my second version so it can be mailed in a regular envelope.

And what about that fern punch? My friend and stamping buddy Skye, knew I wanted to recreate this card but I couldn't find the fern punch that Julee used. Not knowing that I bought this tree punch to use instead, she found the fern punch I had been looking for... and gave it to me for an early Christmas present! What a sweet friend:)
Stamp credits- Stampin' UP
Kimm BT


Thursday, November 6, 2008

Mother of Pearl 2

My card today features the same Mother of Pearl technique (TJ issue Aug. 04) and stamp image as my last post... however I created a different look. I used hunter green embossing powder to emboss the flourish tree image on silver cardstock. Handsome hunter dye ink was used to create the mother of pearl background. A white taffeta ribbon to embellish really pulls it all together!
Stamp credits- Stampin' UP!
Tomorrow... another holiday card with pink!
Kimm

Tuesday, November 4, 2008

Mother of Pearl

I used the mother of pearl background technique (TJ issue Aug. 04) for the under layer on this card. I had not opened my jar of Lumiere pearl paint in 2-3 years when I decided to make a few sheets of this pretty technique.... talk about hoarding supplies;) To my surprise, the paint flowed as it should and was not all dried up! So I happily proceeded to make technique sheets in a few colors. Then I embossed my tree with copper ep on copper cardstock. I love the soft baby pink and copper together.
I've been using a lot of pink in my holiday cards this year... I'll have another card to share in the next day or two that also uses pink!

Stamp credits- Stampin' UP!
Kimm


Sunday, November 2, 2008

Christmas is Coming!

Halloween has passed and the morning air is crisper. I'm so thankful for the change in weather after months and months of summer. The change in seasons also means that Christmas is right around the corner... and it's time to get busy stamping those Christmas cards!
I'll have a holiday card or gift idea to share every other day as we participate in Pat Huntoons Technique Junkies Holiday Extravaganza. The first card above uses two techniques... the light blue layer is Mother of Pearl (TJ issue Aug./Sept. 04) and the red layers are Painted Pigments (TJ issue Aug./Sept. 08). One of the best stamping investments I've made (outside of many ink colors!) is a subscription to Technique Junkies... a variety of techniques helps me keep those creative wings growing!
Stamp credits- Just For Fun Rubber Stamps
Just for Fun Rubber Stamps is having a holiday sale too!
Happy Stamping
Kimm